机械境

这里只是我的后花园,随性而写

介绍

目前部署私有 Docker Registry 有下面几个选择

  • Vmware Harbor
  • 官方 Registry
  • Portus
  • nexus

官方 registry 比较简单,没有 UI 界面;Portus 其实也是基于官方 registry ,可以理解为官方增强版,同时提供了部署的示例;Harbor,nexus 等都比较重量级,部署比较麻烦,这里暂时不考虑。由于我们的使用场景非常简单,所有选用官方 registry 镜像如何部署私有服务器。下面简单介绍下如何配置。

Read more »

缘起

最近在公司搭建了一个基于 Gogs 的代码管理系统,以及基于 Kanboard 的任务管理系统等几个内部系统。由于部署在同一台机器上,基于不同的端口区分不同的服务。比如:

  • Git 服务 http://10.10.1.110:10080
  • 任务管理系统 http://10.10.1.110:8888
  • 其他

为了更好的使用,通过内部域名区分,比如 :

  • Git 服务 http://gogs.vking.io
  • 任务管理系统 http://task.vking.io
  • 其他

注:vking.io 是内部域名,可通过 dnsmasq 配置。

Read more »

在线安装

  • 通过 Setuptools 安装

    easy_install supervisor

  • Ubuntu 安装

    sudo apt-get install supervisor

离线安装

  • PyPi 下载 supervisor 离线包
  • 下载依赖项
    • setuptools (latest) from http://pypi.python.org/pypi/setuptools.
    • meld3 (latest) from http://www.plope.com/software/meld3/.
  • 分别通过 python setup.py install 安装

注:根据不同的系统,可能需要 root 权限执行安装

Read more »

生成 SSH key

  • 生成

    1
    ssh-keygen -t rsa -b 4096 -C "<your_email>" -f github_deploy_key -N ''

    注: 这里使用 github_deploy_key 作为存储的名字

这会生成两个文件

  • 公钥 github_deploy_key.pub

  • 私钥 github_deploy_key

  • 拷贝公钥到剪贴板

    1
    2
    # Copies the contents of the id_rsa.pub file to your clipboard
    $ clip < ~/.ssh/github_deploy_key.pub

    如果是做为项目的部署公钥,需要添加到项目中,以 GitHub 为例,添加公钥的时候需要勾上 Allow Write Access

  • 删除 github_deploy_key.pub

    1
    rm github_deploy_key.pub

    安装 The Travis Client

  • 首先确保已经安装好 Ruby (1.9.3+),官方推荐 2.0.0

  • 执行 gem install travis -v 1.8.8 --no-rdoc --no-ri 安装 travis client

  • 检查安装是否正确 travis version

加密 SSH key

  • 加密文件

    1
    travis encrypt-file github_deploy_key

    加密后的文件为 github_deploy_key.enc

    会输出类似的结果:

    1
    2
    3
    4
    5
    6
    7
    8
    9
    10
    11
    encrypting github_deploy_key for <username>/<repository>
    storing result as github_deploy_key.enc
    storing secure env variables for decryption

    openssl aes-256-cbc -K $encrypted_XXXXXXXXXXXX_key -iv $encrypted_XXXXXXXXXXXX_iv -in github_deploy_key.enc -out github_deploy_key -d

    Pro Tip: You can add it automatically by running with --add.

    Make sure to add github_deploy_key.enc to the git repository.
    Make sure not to add github_deploy_key to the git repository.
    Commit all changes to your .travis.yml.

    注: 如果是 GitHub 项目,建议先通过 travis login 登录,然后再通过 travis encrypt-file github_deploy_key -add 加密,travis Client 会自动更新 .traivs.yaml 并且在 travis 中自动添加变量 encrypted_XXXXXXXXXXXX_keyencrypted_XXXXXXXXXXXX_iv

  • 删除 github_deploy_key

    1
    rm -f github_deploy_key

修改 .travis.yaml

before_install 添加如下内容:

1
2
3
4
5
6
7
8
9
before_install:
- openssl aes-256-cbc -K $encrypted_a7d17a00ff1b_key -iv $encrypted_a7d17a00ff1b_iv
-in .travis/github_deploy_key.enc -out ~/.ssh/github_deploy_key -d
- chmod 600 ~/.ssh/github_deploy_key
- eval $(ssh-agent)
- ssh-add ~/.ssh/github_deploy_key
- cp .travis/ssh_config ~/.ssh/config
- git config --global user.name 'gythialy'
- git config --global user.email 'gythialy@users.noreply.github.com'

注: 步骤如下:通过 openssl 解密文件并输出到 ~/.ssh/github_deploy_key 中;设定 ~/.ssh/github_deploy_key 文件权限并添加到 ssh-agent

ssh_config 内容,主要是防止首次连接的时候,会弹出提示。如果有其他的地址,参考此设置即可。

1
2
3
4
5
6
7
8
9
10
11
12
13
14
15
Host github.com
User git
StrictHostKeyChecking no
IdentityFile ~/.ssh/github_deploy_key
IdentitiesOnly yes
Host gitcafe.com
User git
StrictHostKeyChecking no
IdentityFile ~/.ssh/github_deploy_key
IdentitiesOnly yes
Host git.coding.net
User git
StrictHostKeyChecking no
IdentityFile ~/.ssh/github_deploy_key
IdentitiesOnly yes

至此,就成功在 travis 中添加了 SSH 密钥且能建立链接。可用于且不限于:

  • 推送 CI 编译后的文件 / 结果
  • 免费构建私有项目(这个可能会违反 TOS,不建议…)
  • etc….

参考

  • Connecting to GitHub with SSH
  • Encrypting Files

—EOF—

准备工作

  • 生成 GitHub 的 Personal access tokens,需要有 repo 相关权限

  • 安装 Git deployer plugin for Hexo

    1
    npm install hexo-deployer-git --save

配置

  • 配置 Hexo

    在 Hexo 的_config.yml 中添加 Hexo 编译好后文件的 git 地址,如果需要同时提交到多个不同地址,可以添加多个。

    1
    2
    3
    4
    5
    6
    7
    8
    # Deployment
    ## Docs: https://hexo.io/docs/deployment.html
    deploy:
    type: git
    repo: https://__GITHUB_TOKEN__@github.com/{user_name}/{git_repo}
    branch: master
    name: gythialy
    email: gythialy@users.noreply.github.com

    注:https://__GITHUB_TOKEN__@github.com/{user_name}/{git_repo} 示例为 https://__GITHUB_TOKEN__@github.com/gythialy/gythialy.github.io.git

  • 配置 travis

    在 Hexo 根目录添加 .travis.yml,内容如下:

    1
    2
    3
    4
    5
    6
    7
    8
    9
    10
    11
    12
    13
    14
    15
    16
    17
    18
    19
    20
    21
    22
    23
    24
    25
    26
    27
    language: node_js

    node_js:
    - "7"

    branches:
    only:
    - raw

    before_install:
    - npm install -g hexo-cli
    - npm install -g gulp

    install:
    - npm install

    before_script:
    - git config --global user.name 'gythialy'
    - git config --global user.email 'gythialy@users.noreply.github.com'
    - sed -i "s/__GITHUB_TOKEN__/${__GITHUB_TOKEN__}/" _config.yml
    # use custom theme config
    - git clone --branch v5.1.2 --depth=10 https://github.com/iissnan/hexo-theme-next.git themes/next
    - git checkout -b v5.1.2
    - cp next_config.yml ./themes/next/_config.yml

    script:
    - hexo generate && gulp && hexo deploy

    注: 因为源文件和生成的文件共用了 git repo,所以需要指定只编译 源文件分支(raw),master 作为编译好的文件存放路径。

  • 配置 travis 环境变量

    travis 网页中添加变量 __GITHUB_TOKEN__值为前面生成的 GitHub Personal access tokens

—EOF—

缘起

项目中调用了第三方一个 Matlab 实现的数据清洗和机组状态评价的算法,但是对方不会除 Matlab 外的其他语言,最后只用 Matlab 生成了一个 dll/lib 文件。由于对方提供的接口质量真心不好,而且对方也无力修改。最终方案只好由我方在其基础上用 C++ 重新包装一下。在给我方 Client 调用时,需要把从多数据源查询数据的细节封装掉,最终就形成了 Java Client-> Java Interface->C++ Interface->Matlab/C++ Interface (第三方) 这样一个诡异的调用链。

因只是 Java 单向调用 C++ 接口,故通过 [JNA][jna] 实现。主要设计到 JNA 的结构体封装,指针声明及取值,结构体指针定义及取值。

实现

C++ 的封装接口逻辑非常简单,根据业务提供数据清洗和机组评价的两个接口。

由于 Matlab 导出的 dll 效率是真心差,尤其时加载的时候,各种抛异常,每次加载 dll 大约需耗时 20~30s。所以不能每次加载,故提供 init/terminator 实现按需加载及停用。

C/C++ 头文件定义

1
2
3
4
5
6
7
8
9
10
11
12
13
14
15
16
17
18
19
20
21
22
23
24
25
26
27
28
29
30
31
32
33
34
35
36
37
38
39
40
41
42
43
44
45
46
47
48
49
50
51
52
53
54
55
56
57
58
59
60
61
62
63
64
65
66
67
68
69
70
71
72
73
74
75
76
77
78
79
80
81
82
83
84
85
86
87
88
89
90
91
92
93
94
95
96
97
98
99
100
101
102
103
104
105
106
107
108
109
110
111
112
113
114
115
116
117
118
119
120
121
122
123
124
125
126
127
128
129
130
131
132
133
134
135
136
137
138
139
140
141
142
143
144
145
146
147
148
149
150
151
152
153
154
155
156
157
158
159
160
161
162
163
164
#ifndef __CALCULATOR_API_H__
#define __CALCULATOR_API_H__
#include <cstdint>

#ifdef WIN32
# define EXPORT_API __declspec(dllexport)
#else
# define EXPORT_API
#endif

// Random number to avoid errno conflicts
#define CALCULATOR_ENOBASE 112345678

/* Calculator exceptions */
enum
{
CALCULATOR_EXCEPTION_ILLEGAL_FUNCTION = 0x01,
CALCULATOR_EXCEPTION_ILLEGAL_PARA
};

#define EMBXILFUN (CALCULATOR_ENOBASE + CALCULATOR_EXCEPTION_ILLEGAL_FUNCTION)
#define EMBXILPARA (CALCULATOR_ENOBASE + CALCULATOR_EXCEPTION_ILLEGAL_PARA)

typedef enum
{
H2 = 0X01,
CH4,
C2H2,
C2H4,
TOTAL_HYDROCARBON,//总烃
CO,
CO2
} OilChromatographyType;

/**
* 数据清洗结果
*/
typedef struct sImproveResult
{
int32_t valid; // 有效数据个数
float validPercent; // 数据有效值占比
float* abnormalData; // 异常数据
int32_t abnormal_size; // 异常数据个数
float* optimizeData; // 优化后的数据
int32_t optimize_size; // 优化数据个数
} sImproveResult, *ImproveResult;

/**
* 变压器输入参数
*/
typedef struct sTransformer
{
float h2Value;
float totalHydrocarbon; // 总烃
float c2h2Value;
float coValue;
float co2Value;
float dielectricLoss; // 介损
float dcResistance; //直阻
float absorptance; //吸收比
float polarizeFactor; // 极化系数
float electricCapacity; // 电容量
float moisture; // 微水
float breakdownVoltage; // 击穿电压
float oilDielectricLoss; // 油介损
float interfacialTension; //界面张力
float electricResistivity; //电阻率
int16_t runningLife; // 运行年限
float ambientTemperature; // 环境温度
float jointTemperature; //接头温度
float oilTankTemperature; // 油箱温度
} sTransformer, *Transformer;

/**
* 因素状态隶属度结果
*/
typedef struct sFusionResult
{
float *h1; // 油色谱
int16_t h1_size;
float *h2; // 电气试验
int16_t h2_size;
float *h3; // 绝缘油
int16_t h3_size;
float *h4; // 其余项
int16_t h4_size;
float qz1; // 油色谱权重
float qz2; // 电气试验权重
float qz3; // 绝缘油权重
float qz4; // 其余项权重
float m; // 证据融合参数
float n; // 证据融合参数
} sFusionResult, *FusionResult;

/**
* 最终评价结果
*/
typedef struct sFactorResult
{
float* state;
int16_t state_size;
int8_t* comment;
int16_t comment_len;
} sFactorResult, *FactorResult;

typedef struct
{
int64_t time;
float value;
} sImproveInput, *ImproveInput;

typedef struct sReviewResult
{
Transformer indexScore;
int16_t indexScore_size;
FusionResult indexFusion;
FactorResult factorFusion;
} sReviewResult, *ReviewResult;

#ifdef __cplusplus
extern "C"
{
#endif

/**
* 数据清洗
* @param original[in] 原始数据起始地址
* @param originalLen[in] 原始数据长度
* @param result [out] 数据清洗结果
* @return 0:成功;非0:失败
*/
EXPORT_API int16_t improve_data(const ImproveInput original, const int32_t originalLen, ImproveResult result);

/**
* 状态评价计算
* @param transformer[in] 主变参数
* @param result[out] 评价结果
* @return 0:成功;非0:失败
*/
EXPORT_API int16_t review_transformer(const Transformer transformer, ReviewResult result);


/**
* 初始化 dll
* @return [description]
*/
EXPORT_API int16_t init();

/**
* 根据 err num 获取异常信息描述
* @param errnum[in] errnum
* @return errnum 对应的异常信息描述
*/
EXPORT_API const int8_t* calculator_strerror(int errnum);

/**
* 停止计算模块
**/
EXPORT_API void terminator();

#ifdef __cplusplus
}
#endif
#endif /*__CALCULATOR_API_H__*/

Java 接口定义

  • CalculatorApi

    CalculatorApi 提供与 C++ 头文件中声明一致的函数定义,继承 Library

1
2
3
4
5
6
7
8
9
10
11
12
import com.sun.jna.Library;

public interface CalculatorApi extends Library {

int improve_data(ImproveInputWrapper.ByReference original, int originalLen, ImproveResultWrapper result);

int init();

int review_transformer(TransformerWrapper transformer, ReviewResult result);

void terminator();
}
  • FactorResultWrapper

    作为 C++ 中 结构体 FactorResult 的封装类,需要继承 Structure,原始 state 定义为 float *,通过 Pointer 与其对应。必须要实现 getFieldOrder, 其中字段的顺序必须和 C++ 中保持一致,且所有相关字段必须要设成 Public 。使用的时候,用的引用传递,所以必须要实现 Structure.ByReference 接口。具体代码实现如下:

1
2
3
4
5
6
7
8
9
10
11
12
13
14
15
16
17
18
19
20
21
22
23
24
25
26
27
import com.sun.jna.Pointer;
import com.sun.jna.Structure;

import java.util.List;

public class FactorResultWrapper extends Structure {
private static final List<String> FIELDS_ORDER = createFieldsOrder("state", "state_size", "comment", "comment_len");
public Pointer state;
public int state_size;
public String comment;
public int comment_len;

public static class ByReference extends FactorResultWrapper implements Structure.ByReference {
}

public static class ByValue extends FactorResultWrapper implements Structure.ByValue {
}

public FactorResultWrapper() {
super();
}

@Override
protected List<String> getFieldOrder() {
return FIELDS_ORDER;
}
}
  • FusionResultWrapper

    作为 C++ 中 结构体 FusionResult 的封装类,定义同上。

1
2
3
4
5
6
7
8
9
10
11
12
13
14
15
16
17
18
19
20
21
22
23
24
25
26
27
28
29
30
31
32
33
34
35

import com.sun.jna.Pointer;
import com.sun.jna.Structure;

import java.util.List;

public class FusionResultWrapper extends Structure {
private static final List<String> FIELDS_ORDER = createFieldsOrder("h1", "h1_size", "h2", "h2_size", "h3", "h3_size",
"h4", "h4_size", "qz1", "qz2", "qz3", "qz4", "m", "n");
public Pointer h1; // 油色谱
public int h1_size;
public Pointer h2; // 电气试验
public int h2_size;
public Pointer h3; // 绝缘油
public int h3_size;
public Pointer h4; // 其余项
public int h4_size;
public float qz1; // 油色谱权重
public float qz2; // 电气试验权重
public float qz3; // 绝缘油权重
public float qz4; // 其余项权重
public float m; // 证据融合参数
public float n; // 证据融合参数

public static class ByReference extends FusionResultWrapper implements Structure.ByReference {
}

public static class ByValue extends FusionResultWrapper implements Structure.ByValue {
}

@Override
protected List<String> getFieldOrder() {
return FIELDS_ORDER;
}
}
  • ImproveInputWrapper

    作为 C++ 中 结构体 ImproveInput 的封装类,就是基本类型映射。

1
2
3
4
5
6
7
8
9
10
11
12
13
14
15
16
17
18
19
20
import com.sun.jna.Structure;

import java.util.List;

public class ImproveInputWrapper extends Structure {
private static final List<String> FIELDS_ORDER = createFieldsOrder("time", "value");
public long time;
public float value;

public ImproveInputWrapper() {
}

public static class ByReference extends ImproveInputWrapper implements Structure.ByReference {
}

@Override
protected List<String> getFieldOrder() {
return FIELDS_ORDER;
}
}
  • ImproveResultWrapper

    作为 C++ 中 结构体 ImproveResult 的封装类

1
2
3
4
5
6
7
8
9
10
11
12
13
14
15
16
17
18
19
20
21
22
23
import com.sun.jna.Pointer;
import com.sun.jna.Structure;

import java.util.List;

public class ImproveResultWrapper extends Structure {
private static final List<String> FIELDS_ORDER = createFieldsOrder("valid", "validPercent", "abnormalData", "abnormal_size", "optimizeData", "optimize_size");

public int valid; // 有效数据个数
public float validPercent; // 数据有效值占比
public Pointer abnormalData; // 异常数据
public int abnormal_size; // 异常数据个数
public Pointer optimizeData; // 优化后的数据
public int optimize_size;

public static class ByReference extends ImproveResultWrapper implements Structure.ByReference {
}

@Override
protected List<String> getFieldOrder() {
return FIELDS_ORDER;
}
}
  • ReviewResult

    作为 C++ 中 结构体 ReviewResult 的封装类,此处包含多个结构体指针,需要通过 ByReference 来声明,且需要分配内存。比如 TransformerWrapper.ByReference indexScore,需要通过 toArray 分配内存

1
2
3
4
5
6
7
8
9
10
11
12
13
14
15
16
17
18
19
20
21
22
23
24
25
26
27
28
29
30
31
32
33
34
35
36
37
38
39
40
41
42
43
44
45
46
47
48
49
50
51
52
53
54
55
56
57
58
59
60
61
62
63
64
65
import com.sun.jna.Memory;
import com.sun.jna.Native;
import com.sun.jna.Structure;

import java.util.List;

public class ReviewResult extends Structure {
private final int STATE_SIZE = 5;
private static final List<String> FIELDS_ORDER = createFieldsOrder("indexScore", "indexScore_size", "indexFusion", "factorFusion");
public TransformerWrapper.ByReference indexScore;
public int indexScore_size;
public FusionResultWrapper.ByReference indexFusion;
public FactorResultWrapper.ByReference factorFusion;

public ReviewResult() {
super();
if (indexScore_size == 0)
indexScore_size = STATE_SIZE;
indexScore = new TransformerWrapper.ByReference();
TransformerWrapper[] wrappers = (TransformerWrapper[]) indexScore.toArray(indexScore_size);
for (TransformerWrapper wrapper : wrappers) {
wrapper.h2Value = 0f;
wrapper.totalHydrocarbon = 0f; // 总烃
wrapper.c2h2Value = 0f;
wrapper.coValue = 0f;
wrapper.co2Value = 0f;
wrapper.dielectricLoss = 0f; // 介损
wrapper.dcResistance = 0f; //直阻
wrapper.absorptance = 0f; //吸收比
wrapper.polarizeFactor = 0f; // 极化系数
wrapper.electricCapacity = 0f; // 电容量
wrapper.moisture = 0f; // 微水
wrapper.breakdownVoltage = 0f; // 击穿电压
wrapper.oilDielectricLoss = 0f; // 油介损
wrapper.interfacialTension = 0f; //界面张力
wrapper.electricResistivity = 0f; //电阻率
wrapper.runningLife = 0; // 运行年限
wrapper.ambientTemperature = 0f; // 环境温度
wrapper.jointTemperature = 0f; //接头温度
wrapper.oilTankTemperature = 0f; // 油箱温度
}
indexFusion = new FusionResultWrapper.ByReference();
indexFusion.h1 = new Memory(STATE_SIZE * Native.getNativeSize(Float.TYPE));
indexFusion.h1_size = STATE_SIZE;
indexFusion.h2 = new Memory(STATE_SIZE * Native.getNativeSize(Float.TYPE));
indexFusion.h2_size = STATE_SIZE;
indexFusion.h3 = new Memory(STATE_SIZE * Native.getNativeSize(Float.TYPE));
indexFusion.h3_size = STATE_SIZE;
indexFusion.h4 = new Memory(STATE_SIZE * Native.getNativeSize(Float.TYPE));
indexFusion.h4_size = STATE_SIZE;
factorFusion = new FactorResultWrapper.ByReference();
factorFusion.state = new Memory(STATE_SIZE * Native.getNativeSize(Float.TYPE));
factorFusion.state_size = STATE_SIZE;
factorFusion.comment = "";
factorFusion.comment_len = 0;
}

public static class ByReference extends ReviewResult implements Structure.ByReference {
}

@Override
protected List<String> getFieldOrder() {
return FIELDS_ORDER;
}
}
  • TransformerWrapper

    作为 C++ 中 结构体 Transformer 的封装类

1
2
3
4
5
6
7
8
9
10
11
12
13
14
15
16
17
18
19
20
21
22
23
24
25
26
27
28
29
30
31
32
33
34
35
36
37
38
39
40
41
42
43
44
import com.sun.jna.Structure;

import java.util.List;

public class TransformerWrapper extends Structure {
private static final List<String> FIELDS_ORDER = createFieldsOrder("h2Value", "totalHydrocarbon", "c2h2Value", "coValue", "co2Value", "dielectricLoss",
"dcResistance", "absorptance", "polarizeFactor", "electricCapacity", "moisture", "breakdownVoltage",
"oilDielectricLoss", "interfacialTension", "electricResistivity", "runningLife", "ambientTemperature",
"jointTemperature", "oilTankTemperature");

public float h2Value;
public float totalHydrocarbon; // 总烃
public float c2h2Value;
public float coValue;
public float co2Value;
public float dielectricLoss; // 介损
public float dcResistance; //直阻
public float absorptance; //吸收比
public float polarizeFactor; // 极化系数
public float electricCapacity; // 电容量
public float moisture; // 微水
public float breakdownVoltage; // 击穿电压
public float oilDielectricLoss; // 油介损
public float interfacialTension; //界面张力
public float electricResistivity; //电阻率
public short runningLife; // 运行年限
public float ambientTemperature; // 环境温度
public float jointTemperature; //接头温度
public float oilTankTemperature; // 油箱温度

public static class ByReference extends TransformerWrapper implements Structure.ByReference {
}
public static class ByValue extends TransformerWrapper implements Structure.ByValue {
}

public TransformerWrapper() {
super();
}

@Override
protected List<String> getFieldOrder() {
return FIELDS_ORDER;
}
}
  • CalculatorImpl

    Java 接口的实现类,首先需要从 Jar 中解压 dll 到指定目录,然后通过此目录加载 dll。依赖关系为 Java 接口通过 JNA 加载 calculator.dll ,而 calculator.dll 依赖 pingjia.dll 和另外一个 dll。

    三个 dll 必须在同一目录下, JNA 只需要加载 calculator.dll。因为此处只是在 WIN32 平台执行,所以加载时,通过 Native.loadLibrary 加载的时候,在文件名前加了 /,否则 JNA 会在文件前增加平台相关的 perfix 导致加载失败。

1
2
3
4
5
6
7
8
9
10
11
12
13
14
15
16
17
18
19
20
21
22
23
24
public class CalculatorImpl implements Calculator {
private static final Log LOGGER = Logs.getLog(CalculatorImpl.class);
private static CalculatorApi CALCULATOR_API;

static {
try {
String current = System.getProperty("user.dir");
File matlab = new File(current, "matlab");
System.setProperty("java.library.path", matlab.getPath());
System.setProperty("jna.library.path", matlab.getPath());
// 从 Jar 包 resources 中解压 dll 到指定目录
// Files.createDirIfNoExists(matlab);
// Files.clearDir(matlab);

// 加载 dll 并映射成 Java 接口
CALCULATOR_API = Native.loadLibrary("/calculator.dll", CalculatorApi.class);
// 初始化dll (C++ 实现)
int ret = CALCULATOR_API.init();
LOGGER.debugf("init calculator (%d)", ret);
} catch (Exception e) {
LOGGER.error(e.getMessage(), e);
}
}
}

使用

  • improveData 数据清洗,需要根据 Java Wrapper 的接口,组织数据,内存都在 Java 端分配,由 Java 端负责回收。Pointer 的内存分配,通过 new Memory(size) 来分配。
1
2
3
4
5
6
7
8
9
10
11
12
13
14
15
16
17
18
19
20
21
22
23
24
25
26
27
28
29
30
31
32
33
34
35
36
37
38
39
40
41
42
43
44
45
46
47
48
49
50
51
52
53
54
55
56
private TwoTuple<String, CalculationResult> improveData(String label, List<TwoTuple<String, Float>> values)
throws CalculatorException {
ImproveInputWrapper.ByReference inputsRef = new ImproveInputWrapper.ByReference();
final int valueSize = values.size();
ImproveInputWrapper[] inputs = (ImproveInputWrapper[]) inputsRef.toArray(valueSize);
LOGGER.debug(label + " inputs: ");
for (int i = 0; i < valueSize; i++) {
try {
TwoTuple<String, Float> entry = values.get(i);
Date date = FORMATTER.parse(entry.getKey());
inputs[i].time = date.getTime();
inputs[i].value = entry.getValue();
LOGGER.debugf("%d: %s(%d) -> %f", i, entry.getKey(), inputs[i].time, inputs[i].value);
} catch (ParseException e) {
LOGGER.error(e.getMessage(), e);
}
}

ImproveResultWrapper.ByReference impResultRef = new ImproveResultWrapper.ByReference();
impResultRef.abnormalData = new Memory(valueSize * Native.getNativeSize(Float.TYPE));
impResultRef.abnormalData.setFloat(0, 0);
impResultRef.optimizeData = new Memory(valueSize * Native.getNativeSize(Float.TYPE));
impResultRef.optimizeData.setFloat(0, 0);
impResultRef.abnormal_size = 0;
impResultRef.validPercent = 0;
impResultRef.optimize_size = 0;

int flag = CALCULATOR_API.improve_data(inputsRef, inputs.length, impResultRef);
LOGGER.debug("improve_data flag: " + flag);
CalculationResult.CalculationResultBuilder builder = CalculationResult.CalculationResultBuilder
.aCalculationResult().withOriginalData(values);
if (flag == 0) {
builder.withValidPercent(impResultRef.validPercent).withValidSize(impResultRef.valid);
int abnormalSize = impResultRef.abnormal_size;
LOGGER.debug("abnormalSize: " + abnormalSize);
if (abnormalSize > 0) {
float[] abnormalValues = impResultRef.abnormalData.getFloatArray(0, abnormalSize);
builder.withAbnormalData(Collections.unmodifiableList(Lang.array2list(abnormalValues, Float.class)));
} else {
builder.withAbnormalData(Collections.<Float>emptyList());
}
int optimizeSize = impResultRef.optimize_size;
LOGGER.debug("optimizeSize: " + optimizeSize);
if (optimizeSize > 0) {
float[] optimizeValues = impResultRef.optimizeData.getFloatArray(0, optimizeSize);
builder.withOptimizeData(Collections.unmodifiableList(Lang.array2list(optimizeValues, Float.class)));
} else {
builder.withOptimizeData(Collections.<Float>emptyList());
}
}

CalculationResult result = builder.build();
LOGGER.debug(result);

return new TwoTuple<>(label, result);
}
  • reviewTransformer 机组状态评价,获取 float * 的数据时候的,需要通过 getFloatArray 获取数据。
1
2
3
4
5
6
7
8
9
10
11
12
13
14
15
16
17
18
19
20
21
22
23
24
25
26
27
28
29
30
31
32
33
34
private TransformerResult reviewTransformer(Map<String, Float> values) throws CalculatorException {
TransformerWrapper.ByReference transformerRef = new TransformerWrapper.ByReference();
setTransformer(transformerRef, values);

ReviewResult.ByReference reviewResultRef = new ReviewResult.ByReference();
int flag = CALCULATOR_API.review_transformer(transformerRef, reviewResultRef);
LOGGER.debugf("review_transformer flag: %d", flag);

TransformerResult result = new TransformerResult();
if (flag == 0) {
float[] states = reviewResultRef.factorFusion.state.getFloatArray(0,
reviewResultRef.factorFusion.state_size);
result.setState(states).setComment(reviewResultRef.factorFusion.comment);

float[] h1 = reviewResultRef.indexFusion.h1.getFloatArray(0, reviewResultRef.indexFusion.h1_size);
result.setH1(h1);
float[] h2 = reviewResultRef.indexFusion.h2.getFloatArray(0, reviewResultRef.indexFusion.h2_size);
result.setH2(h2);
float[] h3 = reviewResultRef.indexFusion.h3.getFloatArray(0, reviewResultRef.indexFusion.h3_size);
result.setH3(h3);
float[] h4 = reviewResultRef.indexFusion.h4.getFloatArray(0, reviewResultRef.indexFusion.h4_size);
result.setH4(h4);
result.setQz1(reviewResultRef.indexFusion.qz1).setQz2(reviewResultRef.indexFusion.qz2)
.setQz3(reviewResultRef.indexFusion.qz3).setQz4(reviewResultRef.indexFusion.qz4)
.setM(reviewResultRef.indexFusion.m).setN(reviewResultRef.indexFusion.n);

TransformerWrapper[] wrappers = (TransformerWrapper[]) reviewResultRef.indexScore.toArray(reviewResultRef.indexScore_size);
Transformer[] transformers = transformerWrapperToTransformer(wrappers);
result.setTransformers(transformers);
LOGGER.debug("transfer review result.");
}

return result;
}

小结

  • 优点
    • Java 端不需要编写 C/C++ 代码
  • 缺点
    • 需要编写与 C/C++ 对应的结构体映射,碰到复杂的结构体工作量不小
    • 结构体指针 / 数据通过 toArray 获取数据时,效率较低,尤其时数据量比较大的时候
    • 如果时 C/C++ 端分配的内存,Java 端管理不了,如果 C/C++ 不提供显式回收接口,会导致内存泄露
    • 代码不规范,破坏了 OO 封装性,比如 field 必须要 Public
    • 需要实现 Structure.ByReference 接口,这些明显都可以通过注解来解决

[jna]:https://github.com/java-native-access/jna “Java Native Access”

—EOF—

在多台电脑上操作的时候经常会涉及到 GPG 公钥 / 私钥的导入导出,比方说 GitHub 支持 GPG 加密 Commit,在多台电脑上使用相同的 Key 可以省去很多配置工作。

列出本地的所有 Key

执行 gpg --list-keys 列出本地所有的密钥

输出结果类似

1
2
3
4
5
 $ gpg --list-keys /home/$USER/.gnupg/pubring.gpg 
-----------------------------------
pub 4 096R/375A500B 2017-03-22 [有效至:2018-03-22]
uid Goren G (Git) <gythialy.koo+git@gmail.com>
sub 4096R/ADB9D36C 2017-03-22 [有效至:2018-03-22]

导出

根据 375A500B 导出相应的公钥和私钥

1
2
gpg --output mygpgkey_pub.gpg --armor --export 375A500B
gpg --output mygpgkey_sec.gpg --armor --export-secret-key 375A500B

导入

导入刚导入的文件

1
2
gpg --import ~/mygpgkey_pub.gpg
gpg --allow-secret-key-import --import ~/mygpgkey_sec.gpg

删除密码

1
2
3
4
5
gpg --edit-key 375A500B
# 在弹出的界面中输入原来密码,新密码留空即可
passwd
# 保存修改
save

如果提示 Sorry, no terminal at all requested - can't get input 的话,需要 把 ~/.gnupg/gpg.conf 中的 no-tty 注释掉

—EOF—

介绍

babun 号称是开箱即用的,本质是上就是 cygwin 加上了一些预设的配置。特性如下:

  • Pre-configured Cygwin with a lot of addons
  • Silent command-line installer, no admin rights required
  • pact - advanced package manager (like apt-get or yum)
  • xTerm-256 compatible console
  • HTTP(s) proxying support
  • Plugin-oriented architecture
  • Pre-configured git and shell
  • Integrated oh-my-zsh
  • Auto update feature
  • “Open Babun Here” context menu entry

安装

下载安装包解压缩到任意目录后,运行 install.bat。也可以使用 /t %target_folder% 指定安装目录。

配置

既然是开箱即用,对大多数人来说当然不需要太多配置,一般需要以下两个命令:

  • babun check 用于判断环境是否正确
  • babun update 用于判断是否有新的更新包

包管理

babun 自带了叫做 pact 的包管理,修改自 apt-cyg, 但比较弱,用法如下:

1
2
3
4
5
6
7
8
9
10
11
12
13
14
15
16
17
18
{ ~ }  » pact --help
pact: Installs and removes Cygwin packages.

Usage:
"pact install <package names>" to install given packages
"pact remove <package names>" to remove given packages
"pact update <package names>" to update given packages
"pact show" to show installed packages
"pact find <patterns>" to find packages matching patterns
"pact describe <patterns>" to describe packages matching patterns
"pact packageof <commands or files>" to locate parent packages
"pact invalidate" to invalidate pact caches (setup.ini, etc.)
Options:
--mirror, -m <url> : set mirror
--invalidate, -i : invalidates pact caches (setup.ini, etc.)
--force, -f : force the execution
--help
--version

和 Windows 共享配置

  1. 添加环境变量 HOME,值为 Windows 的用户目录 C:\Users\%USERNAME%
  2. 启动 babun,执行 babun install,重启 babun

% USERNAME% 不能包含空格。如果用户名已经有空格,参考这里解决。

代理设置

只需要取消 .babunrc 中的注释 (%USERPROFILE%\.babunrc)

1
2
3
4
5
# Uncomment this lines to set up your proxy
export http_proxy=user:password@server:port
export https_proxy=$http_proxy
export ftp_proxy=$http_proxy
export no_proxy=localhost

镜像

修改 ~/.pact/pact.repo 中的 PACT_REPO 字段

1
2
3
4
5
6
7
8
9
10
11
12
13
14
15
16
#PACT_REPO=http://mirrors.kernel.org/sourceware/cygwin/
PACT_REPO=http://mirrors.neusoft.edu.cn/cygwin/

# POPULAR HTTP REPOSITORIES
# http://mirror.switch.ch/ftp/mirror/cygwin/

# POPULAR FTP REPOSITORIES
# ftp://mirror.switch.ch/mirror/cygwin/
# ftp://ftp.inf.tu-dresden.de/software/windows/cygwin32/
# ftp://mirrors.kernel.org/sourceware/cygwin/
# ftp://gd.tuwien.ac.at/gnu/cygwin/
# ftp://ftp.iij.ad.jp/pub/cygwin/
# ftp://mirror.cpsc.ucalgary.ca/cygwin.com/

# FULL LIST
# http://cygwin.com/mirrors.html

常用开发环境配置

Python

babun 自带的 Python2 并没有安装 pip,需要手动安装

1
2
3
pact install python-setuptools python-ming
pact install libxml2-devel libxslt-devel libyaml-devel
curl -skS https://bootstrap.pypa.io/get-pip.py | python

Ruby

执行 pact install ruby

如果 ruby -v 不能返回版本,执行 update.bat 更新 cygwin 的版本。via Issue #483

FAQ

  • compdef: unknown command or service: git

    1
    2
    $ compinit
    $ cp .zcompdump .zcompdump-$HOSTNAME-$ZSH_VERSION
  • 删除右键中的 Open Babun here
    执行 babun shell-here remove

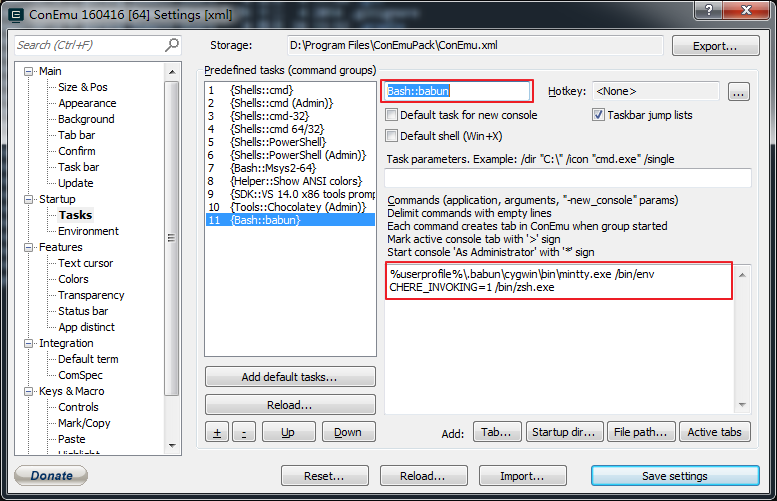
  • 与 ConEmu 集成
    %userprofile%\.babun\cygwin\bin\mintty.exe /bin/env CHERE_INVOKING=1 /bin/zsh.exe
    ConEmu Settings

  • X64
    官方对于 64 位的解释。懒人也可以直接使用这个 PR 编译的分发包。有兴趣的也可以通过我合并的 x64 分支 自行构建。

总结

总的来说,babun 比 MSYS2 慢,包也不多,稳定性 / 兼容性貌似好一点。

最终配置效果:
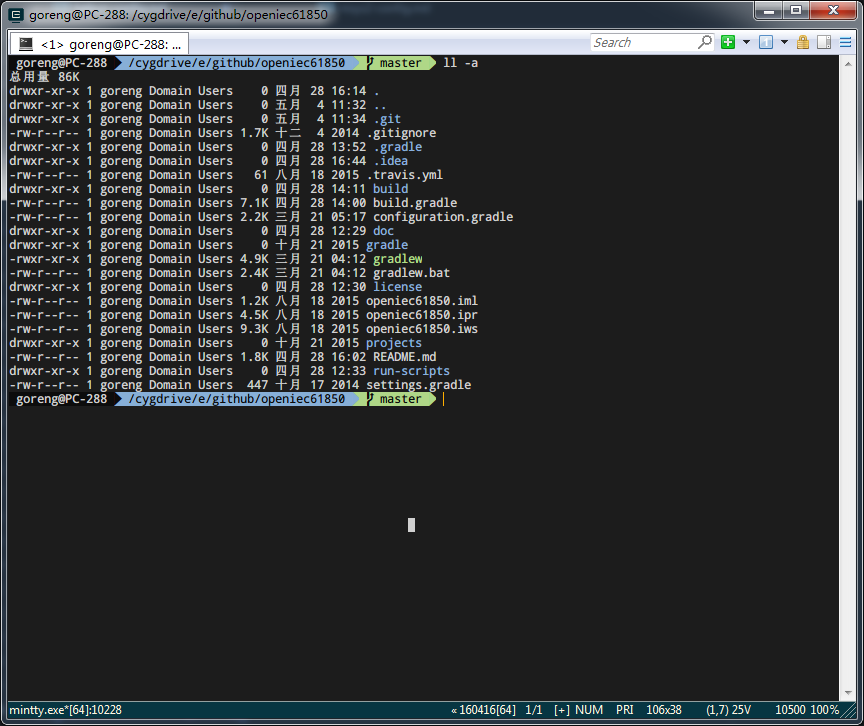
babun

—EOF—

0%